Hot Chocolate Cheesecake Recipe
Introduction
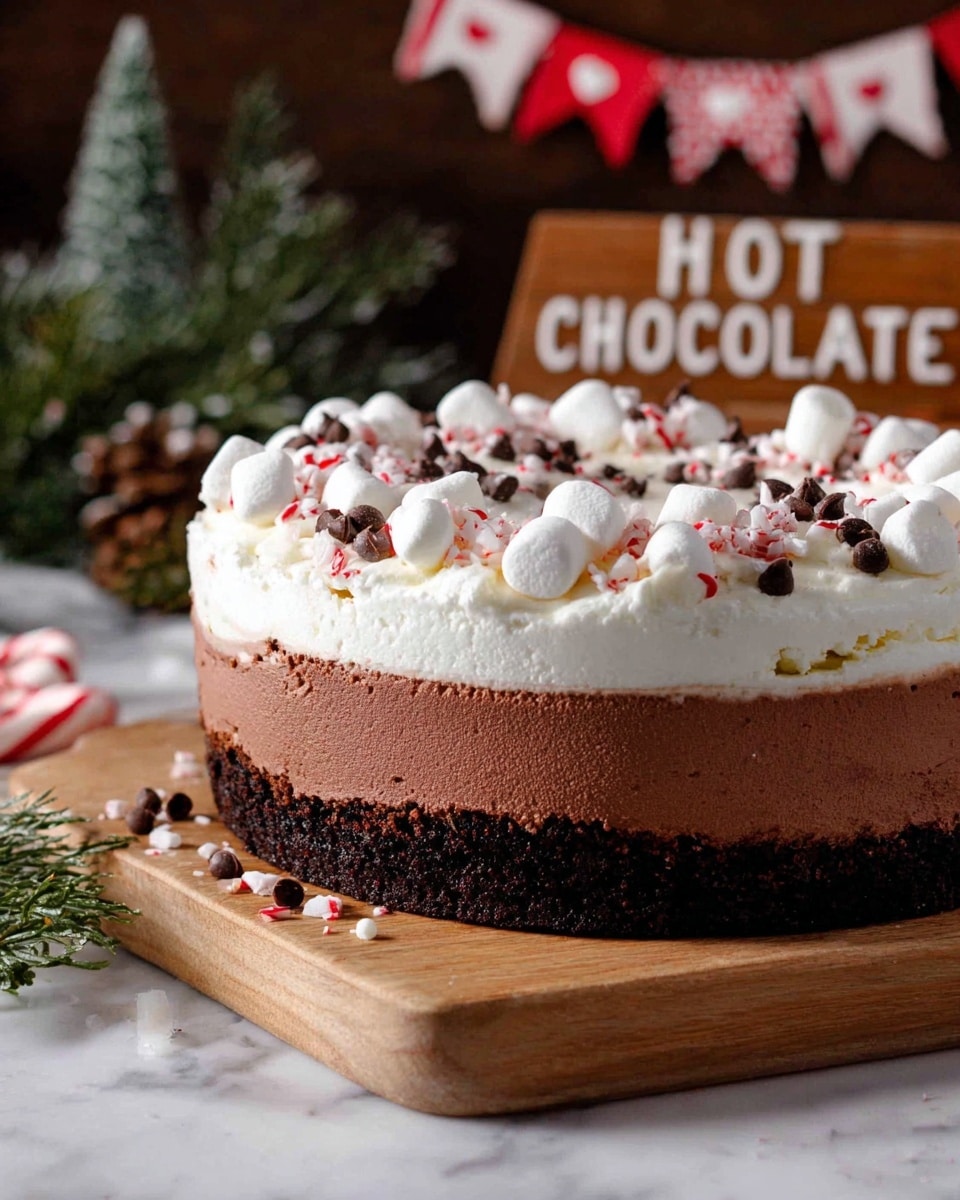
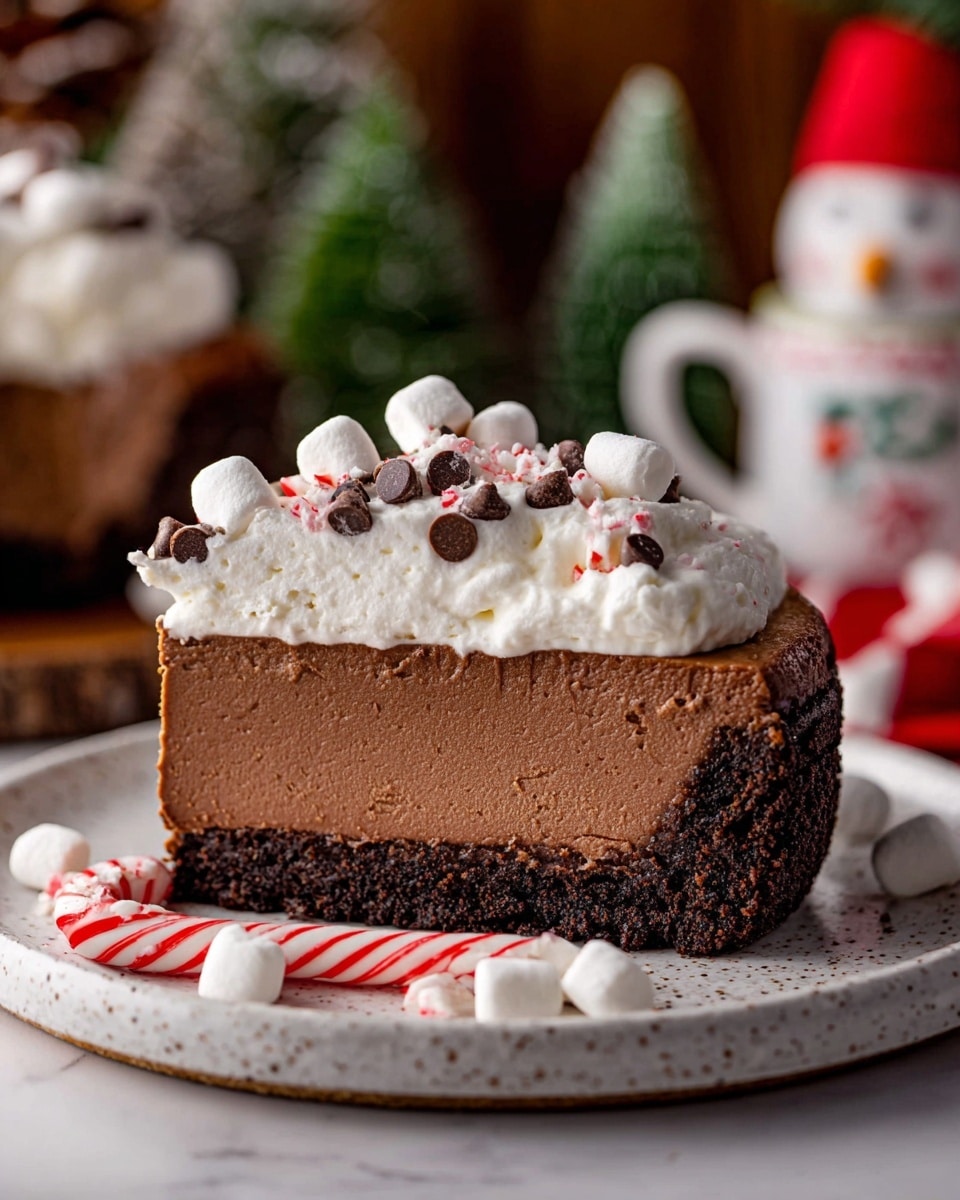
This Hot Chocolate Cheesecake is a rich and creamy dessert that combines the indulgence of chocolate with the smooth texture of cheesecake. Featuring an Oreo crust and a luscious hot cocoa-flavored filling, it’s perfect for cozy nights or special occasions.
Ingredients
- 3 cups Oreos (fine crumb)
- 5 tablespoons Unsalted butter (melted)
- 24 ounces Cream cheese (room temperature)
- 3/4 cup White granulated sugar
- 1/2 cup Hot cocoa mix (2 packets)
- 1/3 cup Unsweetened cocoa powder
- 1/2 cup Sour cream (room temperature)
- 1/4 cup Heavy cream (room temperature)
- 1 teaspoon Pure vanilla extract
- 4 Large eggs (room temperature)
- 1 1/2 cups Heavy cream (cold)
- 1/4 cup Powdered sugar
- 1 teaspoon Pure vanilla extract
Instructions
- Step 1: Preheat the oven to 325℉. Spray a 9-inch springform pan with baking spray, line the bottom with a parchment paper circle, and spray again.
- Step 2: Using a food processor, blend the Oreos into fine crumbs. In a small bowl, mix the Oreo crumbs with melted butter using a fork.
- Step 3: Pour the crumb mixture into the prepared pan. Press the crumbs firmly onto the bottom and halfway up the sides using your hands and the bottom of a measuring cup to compact.
- Step 4: Bake the crust for 11 minutes.
- Step 5: Using a mixer, beat the cream cheese and sugar on high speed for 2 minutes. Scrape the bowl with a rubber spatula.
- Step 6: Add hot cocoa mix, cocoa powder, sour cream, heavy cream, and vanilla extract. Mix on medium speed until combined, scraping the bowl as needed.
- Step 7: Add eggs and mix on low speed just until combined. Finish mixing carefully with the spatula.
- Step 8: Pour the batter over the baked crust.
- Step 9: Prepare a water bath using one of these methods:
- Place the springform pan into a 10-inch cake pan, then set the cake pan inside a roasting pan. Fill the roasting pan with hot water halfway up the sides of the cake pan to keep water away from the crust.
- Wrap the springform pan tightly twice with aluminum foil. Place it inside a roasting pan and fill with hot water halfway up the springform pan. This method may allow some water into the crust.
- Step 10: Bake for 75-85 minutes until the edges are set and the center has a slight jiggle.
- Step 11: Turn off the oven, crack the door open, and let the cheesecake cool slowly for 30 minutes. Then transfer the pan to a cooling rack and cool completely.
- Step 12: Cover the cheesecake with foil and chill for at least 6 hours or overnight.
- Step 13: For the whipped cream, beat cold heavy cream, powdered sugar, and vanilla extract in a metal bowl with a whisk attachment on high speed until medium peaks form.
- Step 14: Remove the cheesecake from the pan and parchment paper. Top with whipped cream and optionally garnish with mini marshmallows, mini chocolate chips, or crushed candy canes.
Tips & Variations
- Use room temperature ingredients to ensure a smooth, creamy filling without lumps.
- For extra chocolate richness, add a handful of mini chocolate chips into the batter before baking.
- Wrap the springform pan carefully to avoid water leaks during the water bath baking.
- Top with flavored whipped cream like peppermint or cinnamon for a festive twist.
Storage
Cover and store the cheesecake in the refrigerator for up to 5 days. To reheat, let it come to room temperature briefly; it’s best served chilled. Whipped cream topping is best added fresh before serving.
How to Serve
Serve this delicious recipe with your favorite sides.
FAQs
Can I use regular cocoa powder instead of hot cocoa mix?
Yes, but the hot cocoa mix adds extra sweetness and flavor. If substituting, adjust the sugar in the recipe accordingly.
How do I prevent cracks in my cheesecake?
Using a water bath helps regulate baking temperature and moisture, which reduces cracking. Also, avoid overbaking and chill the cheesecake thoroughly before slicing.
PrintHot Chocolate Cheesecake Recipe

Indulge in this rich and creamy Hot Chocolate Cheesecake featuring a crunchy Oreo crust, a velvety chocolate-infused cheesecake filling, and a luscious homemade whipped cream topping. Perfect for chocolate lovers seeking a decadent dessert with a smooth balance of sweetness and chocolate flavor, complemented by optional festive garnishes like mini marshmallows, mini chocolate chips, and crushed candy canes.
- Prep Time: 20 minutes
- Cook Time: 1 hour 35 minutes
- Total Time: 8 hours 55 minutes
- Yield: 12 servings 1x
- Category: Dessert
- Method: Baking
- Cuisine: American
Ingredients
Oreo Crust
- 3 cups Oreos, finely crushed
- 5 tablespoons unsalted butter, melted
Cheesecake Filling
- 24 oz cream cheese, room temperature
- 3/4 cup white granulated sugar
- 1/2 cup hot cocoa mix (2 packets)
- 1/3 cup unsweetened cocoa powder
- 1/2 cup sour cream, room temperature
- 1/4 cup heavy cream, room temperature
- 1 teaspoon pure vanilla extract
- 4 large eggs, room temperature
Whipped Cream Topping
- 1 1/2 cups heavy cream, cold
- 1/4 cup powdered sugar
- 1 teaspoon pure vanilla extract
- Optional decorations: mini marshmallows, mini chocolate chips, crushed candy canes
Instructions
- Prepare the Oven and Pan: Preheat your oven to 325°F (163°C). Spray a 9-inch springform pan with baking spray. Line the bottom of the pan with a parchment paper circle and spray again to ensure easy removal of the cheesecake later.
- Make the Oreo Crust: Using a food processor, blend the Oreo cookies into fine crumbs. In a small bowl, combine the Oreo crumbs with melted unsalted butter and mix thoroughly with a fork to evenly coat the crumbs.
- Press the Crust: Pour the Oreo crumb mixture into the prepared springform pan. Use your hands to press the crumbs firmly up halfway along the sides of the pan. Then, use the bottom of a measuring cup to compact the crust firmly on the bottom for an even base.
- Bake the Crust: Bake the crust in the preheated oven for 11 minutes to set it. This helps create a sturdy base for the cheesecake filling. Once done, remove from the oven and set aside.
- Beat the Cream Cheese and Sugar: In a large mixing bowl, use an electric mixer on high speed to beat the cream cheese and granulated sugar together for about 2 minutes until smooth and creamy. Scrape down the sides of the bowl with a rubber spatula to incorporate all ingredients evenly.
- Add Cocoa and Cream Ingredients: Add the hot cocoa mix, unsweetened cocoa powder, sour cream, heavy cream, and vanilla extract to the cream cheese mixture. Mix on medium speed until all ingredients are blended well. Scrape the bowl as needed to ensure thorough mixing.
- Add Eggs: Add the eggs one at a time and mix on low speed just until combined after each addition to avoid overmixing. Finish by folding the batter gently with a spatula to incorporate any remaining streaks.
- Prepare Water Bath and Pour Batter: Pour the cheesecake batter over the pre-baked Oreo crust. Prepare a water bath to bake the cheesecake evenly and prevent cracking. To do this, place the springform pan inside a larger cake pan, then place both into a large roasting pan. Fill the roasting pan with hot steaming water halfway up the sides of the cake pan, being careful to prevent water from seeping into the crust. Alternatively, wrap the springform pan tightly twice with aluminum foil and place it directly in the roasting pan with hot water halfway up the springform pan.
- Bake the Cheesecake: Place the setup in the oven and bake for 75 to 85 minutes, or until the edges are set but the center still has a slight jiggle. This ensures the perfect creamy texture inside.
- Cool the Cheesecake: Turn off the oven and crack open the door. Allow the cheesecake to cool slowly inside the oven for about 30 minutes to prevent cracking. Then, transfer the cheesecake to a wire rack to cool completely at room temperature.
- Chill the Cheesecake: Cover the cooled cheesecake tightly with foil and refrigerate for at least 6 hours, preferably overnight, to allow it to set fully and develop flavors.
- Make the Whipped Cream: Using a metal mixing bowl fitted with a whisk attachment, beat cold heavy cream, powdered sugar, and vanilla extract on high speed until medium peaks form. This creates a smooth, fluffy topping.
- Decorate and Serve: Remove the chilled cheesecake from the springform pan and peel off the parchment paper from the bottom. Spread or pipe the whipped cream evenly on top of the cheesecake. Optionally, garnish with mini marshmallows, mini chocolate chips, and crushed candy canes for festive flair. Serve chilled and enjoy!
Notes
- Using room temperature ingredients helps achieve a smooth, lump-free cheesecake batter.
- Make sure to tightly wrap the springform pan when using the water bath method to avoid water leakage into the crust.
- For best texture, chill the cheesecake overnight before serving.
- Optional toppings add texture and festive appearance but are not required.
- To prevent cracks on the cheesecake surface, avoid overmixing eggs into the batter and bake with a water bath.
Keywords: Hot Chocolate Cheesecake, Oreo crust, chocolate cheesecake, creamy dessert, holiday dessert, whipped cream topping