Crispy Chicken Caesar Sandwich Recipe
Introduction
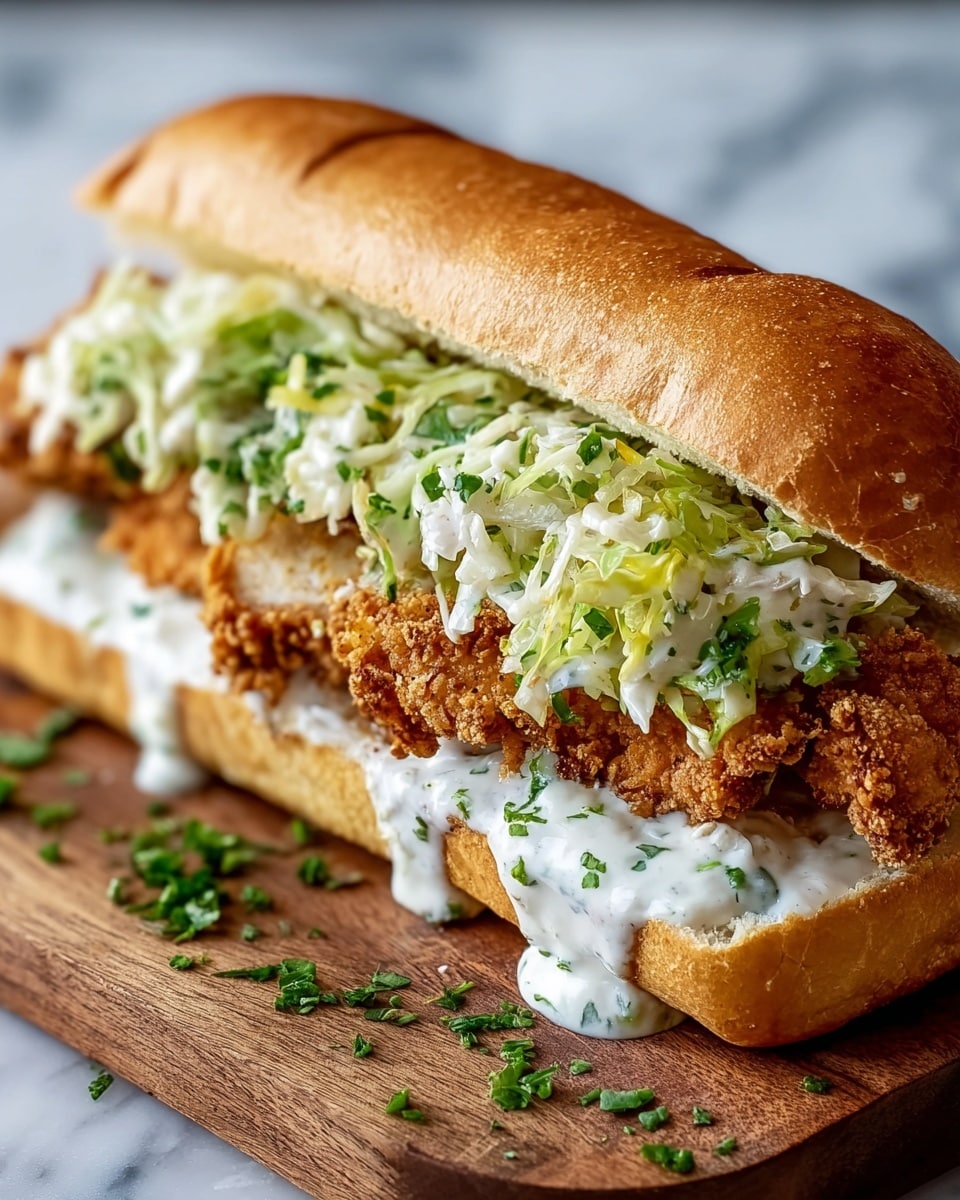
The Crispy Chicken Caesar Sandwich is a delicious twist on a classic favorite. Featuring tender, marinated chicken with a crunchy Parmesan-panko coating and creamy Caesar flavors, it’s perfect for a satisfying lunch or dinner. This must-try recipe combines easy steps with bold taste for a homemade sandwich you’ll crave again and again.
Ingredients
- 2 large boneless skinless chicken breasts
- 1 cup buttermilk
- 1 teaspoon garlic powder
- 1 teaspoon onion powder
- 1 teaspoon paprika
- 1 teaspoon salt
- 1/2 teaspoon black pepper
- 1 cup all-purpose flour
- 1 cup panko breadcrumbs
- 1/2 cup grated Parmesan cheese
- 1/4 cup mayonnaise
- 1 tablespoon lemon juice
- 1 teaspoon Worcestershire sauce
- 4 sandwich rolls (ciabatta or brioche)
- 2 cups romaine lettuce, chopped
- 1/2 cup Caesar dressing
- Extra Parmesan cheese for garnish (optional)
Instructions
- Step 1: In a large bowl, combine buttermilk, garlic powder, onion powder, paprika, salt, and black pepper. Add the chicken breasts, coat well, cover, and marinate in the fridge for at least one hour or overnight for best results.
- Step 2: In a shallow dish, mix together flour, panko breadcrumbs, and grated Parmesan cheese to prepare the breading mixture.
- Step 3: Remove chicken from marinade, letting excess drip off. Dredge each piece in the breading mixture, pressing lightly to ensure an even coating.
- Step 4: Preheat oven to 400°F (200°C). Line a baking sheet with parchment paper and arrange the breaded chicken pieces with space between them. Bake for 20–25 minutes until golden and cooked through to an internal temperature of 165°F (74°C).
- Step 5: While the chicken bakes, whisk mayonnaise, lemon juice, and Worcestershire sauce in a small bowl to make the Caesar sauce.
- Step 6: Once the chicken is done, let it rest a few minutes. Split the rolls and toast them lightly if desired.
- Step 7: Spread Caesar sauce on both sides of each roll. Layer with chopped romaine lettuce, place the crispy chicken breasts on top, drizzle with Caesar dressing, and add extra Parmesan if you like. Close the sandwiches and serve.
Tips & Variations
- For extra crispiness, double-dip the chicken in the buttermilk and breading before baking.
- Swap out the sandwich rolls for wraps or ciabatta sliders to change up the presentation.
- Add sliced tomatoes or avocado for extra freshness and creaminess.
- Use homemade Caesar dressing for a more authentic flavor boost.
Storage
Store any leftover crispy chicken separately in an airtight container in the refrigerator for up to 3 days. Sandwiches are best assembled fresh to maintain the crunch of the chicken and the texture of the bread. Reheat chicken gently in the oven at 350°F (175°C) for 5–7 minutes to restore crispness before assembling your sandwich.
How to Serve

Serve this delicious recipe with your favorite sides.
FAQs
Can I use frozen chicken breasts for this recipe?
Yes, but make sure to fully thaw the chicken breasts and pat them dry before marinating to ensure even cooking and a good coating.
Is it possible to fry the chicken instead of baking?
Absolutely! For an extra crispy exterior, you can shallow fry the breaded chicken in oil over medium heat until golden and cooked through, about 4–5 minutes per side.
PrintCrispy Chicken Caesar Sandwich Recipe

This Crispy Chicken Caesar Sandwich combines tender marinated chicken with a crunchy Parmesan and panko crust, baked to golden perfection. Layered with fresh romaine, creamy Caesar dressing, and a zesty homemade Caesar sauce on toasted ciabatta or brioche rolls, it’s a flavorful and satisfying sandwich perfect for lunch or dinner.
- Prep Time: 10 minutes
- Cook Time: 25 minutes
- Total Time: 1 hour 35 minutes
- Yield: 4 sandwiches 1x
- Category: Sandwich
- Method: Baking
- Cuisine: American
- Diet: Halal
Ingredients
Chicken and Marinade
- 2 large boneless skinless chicken breasts
- 1 cup buttermilk
- 1 teaspoon garlic powder
- 1 teaspoon onion powder
- 1 teaspoon paprika
- 1 teaspoon salt
- 1/2 teaspoon black pepper
Breading
- 1 cup all-purpose flour
- 1 cup panko breadcrumbs
- 1/2 cup grated Parmesan cheese
Caesar Sauce
- 1/4 cup mayonnaise
- 1 tablespoon lemon juice
- 1 teaspoon Worcestershire sauce
Assembly
- 4 sandwich rolls (ciabatta or brioche)
- 2 cups romaine lettuce, chopped
- 1/2 cup Caesar dressing
- Extra Parmesan cheese for garnish (optional)
Instructions
- Marinate the Chicken: In a large bowl, combine buttermilk, garlic powder, onion powder, paprika, salt, and black pepper. Add the chicken breasts and coat them well. Cover and refrigerate for at least 1 hour or overnight for maximum tenderness and flavor infusion.
- Prep the Breading: In a shallow dish, mix together the all-purpose flour, panko breadcrumbs, and grated Parmesan cheese. This mixture will create a crispy, flavorful coating for the chicken.
- Bread the Chicken: Remove each chicken breast from the marinade, letting excess drip off. Dredge each piece thoroughly in the breadcrumb mixture, pressing gently to ensure an even coating that will stay crisp when baked.
- Bake to Perfection: Preheat oven to 400°F (200°C). Line a baking sheet with parchment paper and arrange the breaded chicken breasts spaced apart. Bake for 20 to 25 minutes or until the crust is golden and the internal temperature reaches 165°F (74°C). Remove from oven and let rest briefly.
- Whip Up the Caesar Sauce: While chicken bakes, whisk together mayonnaise, lemon juice, and Worcestershire sauce in a small bowl until smooth. This sauce adds creamy zest to the sandwich layers.
- Toast and Prep the Rolls: Split the sandwich rolls and toast them lightly if desired. Toasting adds crunch and helps prevent sogginess when adding sauces and fillings.
- Assemble and Serve: Spread the homemade Caesar sauce evenly on both sides of each roll. Layer chopped romaine lettuce on the bottom half, nestle the crispy baked chicken on top, drizzle with Caesar dressing, and sprinkle extra Parmesan cheese if using. Close the sandwich and enjoy immediately for the best crunchy, creamy, and flavorful bite.
Notes
- Marinating the chicken in buttermilk is key for juicy, tender meat.
- Panko breadcrumbs are preferred for extra crunch over regular breadcrumbs.
- Ensure oven temperature is accurate for perfect baking results.
- Feel free to use a meat thermometer to check chicken doneness to avoid overcooking.
- Sandwich rolls like ciabatta or brioche hold up well to the sauces without getting soggy.
Keywords: Crispy Chicken Caesar Sandwich, baked chicken sandwich, Caesar dressing, panko crust chicken, easy chicken sandwich recipe, homemade Caesar sauce