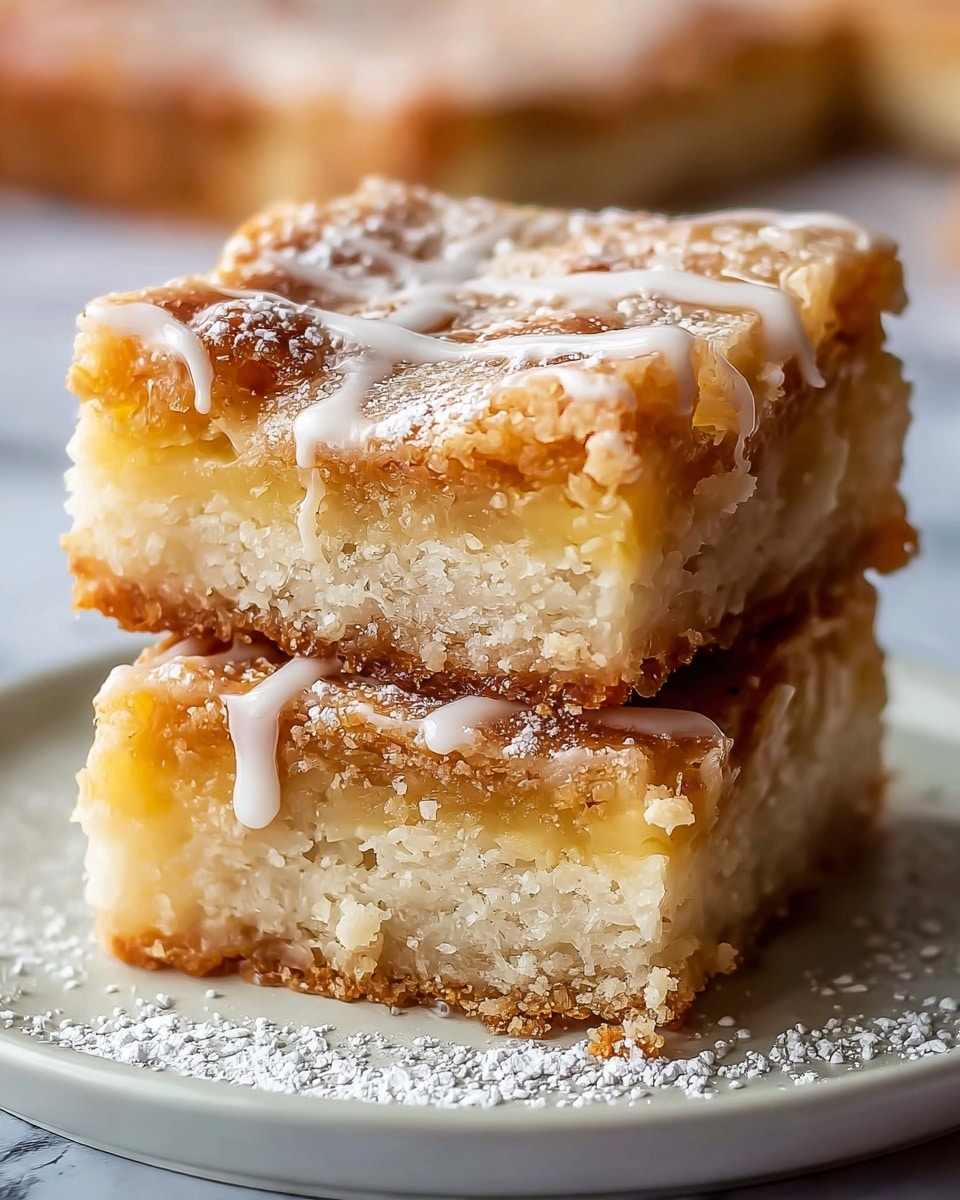
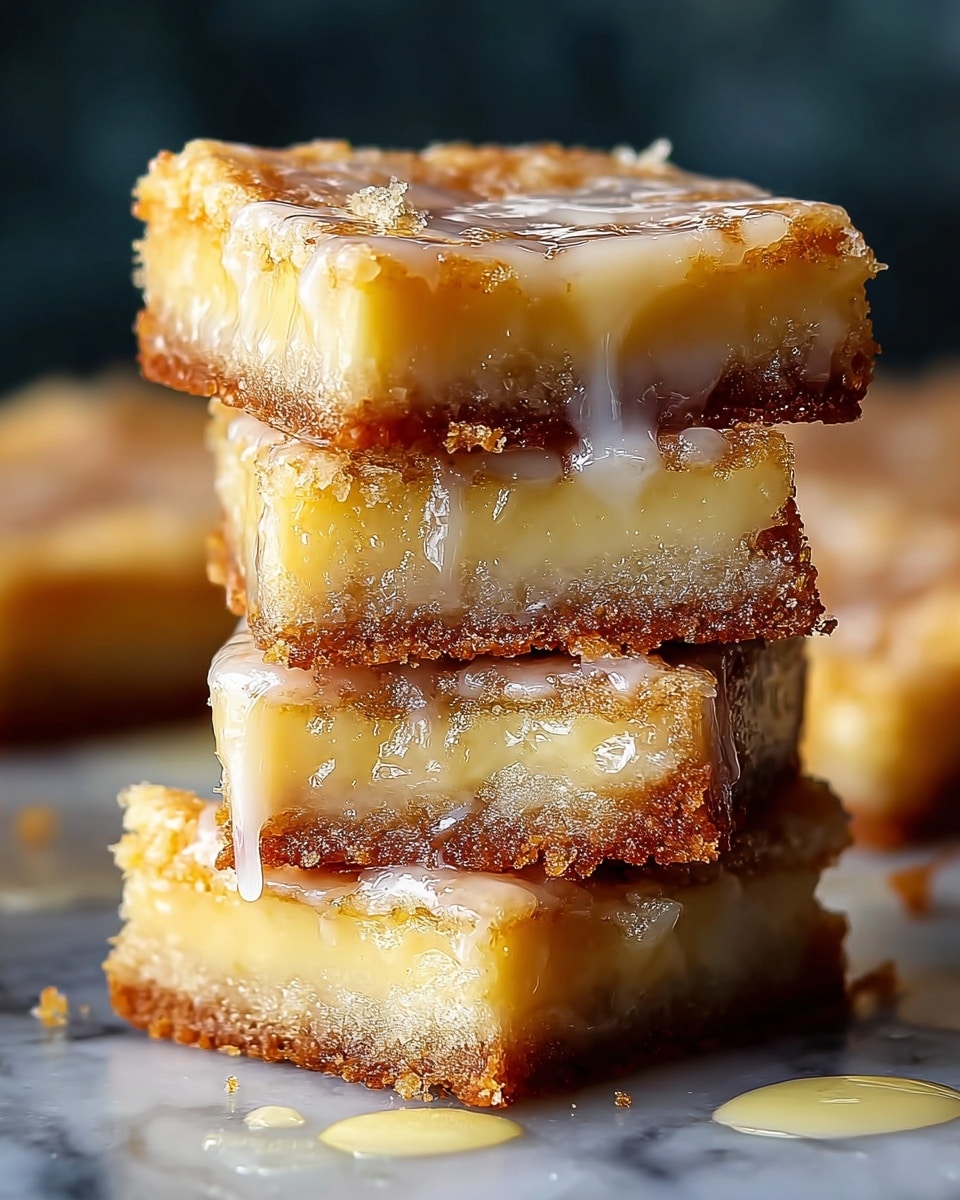
Old Fashioned Buttermilk Donut Bars Recipe
Introduction
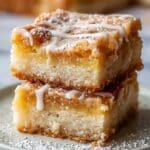
Old Fashioned Buttermilk Donut Bars combine the nostalgic flavor of classic donuts with a convenient bar shape perfect for sharing. These tender, fluffy bars are deep-fried to golden perfection and finished with a smooth vanilla glaze that adds a sweet, melt-in-your-mouth touch.
Ingredients
- ½ cup (113g) unsalted butter
- 1 ¼ cups (250g) granulated sugar
- 2 large eggs
- 1 tsp pure vanilla extract
- 4 ½ cups (540g) all-purpose flour
- 1 ½ tsp baking powder
- 1 tsp baking soda
- ¾ tsp salt
- ½ tsp freshly grated nutmeg
- 1 ½ cups (360ml) buttermilk
- Vegetable oil or canola oil, for deep frying
- 4 cups (480g) confectioners’ sugar, sifted
- ½ cup (120ml) whole milk or heavy cream
- 1 ½ tsp pure vanilla extract
- ¼ tsp salt
Instructions
- Step 1: In a large bowl, whisk together the flour, baking powder, baking soda, salt, and freshly grated nutmeg. Set this dry mixture aside.
- Step 2: In a stand mixer, cream the softened butter and granulated sugar on medium speed for 3-5 minutes until light, fluffy, and pale.
- Step 3: Add eggs one at a time, beating well after each addition. Scrape down the sides of the bowl and stir in the vanilla extract.
- Step 4: On low speed, alternately add the dry mixture and buttermilk to the wet ingredients, starting and ending with the dry ingredients. Mix just until flour streaks disappear; do not overmix. The dough will be soft and sticky.
- Step 5: Turn the dough onto a lightly floured surface and shape it into a disc or rectangle. Wrap tightly in plastic wrap and refrigerate for at least 2 hours, preferably overnight. This step is essential for easy handling and tender results.
- Step 6: Lightly flour your work surface, rolling pin, and hands. Roll out the chilled dough into a large rectangle about ½ inch (1 cm) thick, ensuring an even thickness throughout.
- Step 7: Using a sharp knife or pizza cutter, cut the dough into rectangular bars approximately 1 inch wide and 3-4 inches long. Place the bars on a lightly floured or parchment-lined baking sheet.
- Step 8: In a large, heavy-bottomed pot, pour enough oil to reach 3-4 inches deep. Attach a deep-fry thermometer and heat the oil over medium-high heat to 350°F (175°C). Maintaining temperature is crucial for perfect frying.
- Step 9: Carefully lower 3-4 donut bars into the hot oil using a slotted spoon. Avoid overcrowding. Fry each side for 1-2 minutes until they are golden brown and puffed up.
- Step 10: Remove the donut bars with a slotted spoon, allowing excess oil to drip off. Transfer them to a wire rack set over paper towels to drain and cool slightly. Glaze while still warm but not hot.
- Step 11: In a medium bowl, whisk together the sifted confectioners’ sugar, milk or cream, vanilla extract, and salt until smooth and pourable. Adjust consistency by adding more milk (½ tsp at a time) or sugar (1-2 tbsp) as needed.
- Step 12: Dip each warm donut bar into the vanilla glaze, coating one side or fully submerging. Lift and let excess glaze drip off. Place glazed bars back on the wire rack to set for 15-30 minutes before serving.
Tips & Variations
- Chilling the dough overnight enhances flavor and makes it much easier to roll and cut.
- Use freshly grated nutmeg for a warm, aromatic touch that complements the buttermilk.
- For a richer glaze, substitute heavy cream for milk.
- Try dipping the bars halfway and sprinkling with cinnamon sugar instead of glazing for a different twist.
Storage
Store leftover donut bars in an airtight container at room temperature for up to 2 days to maintain their crispness. For longer storage, keep them in the refrigerator for up to 4 days, but note they may lose some texture. Reheat gently in a toaster oven or oven at low heat to restore warmth and crispiness before serving.
How to Serve
Serve this delicious recipe with your favorite sides.
FAQs
Can I bake these instead of frying?
While deep frying creates the signature texture and flavor, you can bake the donut bars at 350°F (175°C) for about 15-20 minutes until golden. They won’t be as crisp but will still be tasty.
What if I don’t have buttermilk?
You can make a buttermilk substitute by adding 1 ½ tablespoons of white vinegar or lemon juice to 1 ½ cups of milk. Let it sit for 5-10 minutes before using.
PrintOld Fashioned Buttermilk Donut Bars Recipe
Old Fashioned Buttermilk Donut Bars are a nostalgic treat featuring a tender, slightly sweet dough enriched with buttermilk and warm spices, fried to golden perfection and glazed with a luscious vanilla icing. These rectangular donut bars combine classic flavors with a unique shape for a delightful breakfast or dessert option.
- Prep Time: 20 minutes
- Cook Time: 15 minutes
- Total Time: 2 hours 35 minutes (including chilling)
- Yield: Approximately 24 donut bars 1x
- Category: Dessert
- Method: Frying
- Cuisine: American
Ingredients
Dough
- ½ cup (113g) unsalted butter
- 1 ¼ cups (250g) granulated sugar
- 2 large eggs
- 1 tsp pure vanilla extract
- 4 ½ cups (540g) all-purpose flour
- 1 ½ tsp baking powder
- 1 tsp baking soda
- ¾ tsp salt
- ½ tsp freshly grated nutmeg
- 1 ½ cups (360ml) buttermilk
Frying
- Vegetable oil or canola oil, for deep frying
Vanilla Glaze
- 4 cups (480g) confectioners’ sugar, sifted
- ½ cup (120ml) whole milk or heavy cream
- 1 ½ tsp pure vanilla extract
- ¼ tsp salt
Instructions
- Prepare Dry Ingredients: In a large bowl, whisk together the all-purpose flour, baking powder, baking soda, salt, and freshly grated nutmeg until evenly combined. Set this mixture aside for later use.
- Cream Butter and Sugar: Using a stand mixer, cream softened unsalted butter and granulated sugar on medium speed for 3-5 minutes until the mixture is light, fluffy, and pale in color, which helps create a tender texture in the final donut bars.
- Add Eggs and Vanilla: Incorporate eggs one at a time into the creamed mixture, beating well after each addition. Scrape down the sides of the bowl to ensure even mixing, then stir in the pure vanilla extract for flavor.
- Combine Wet and Dry Ingredients: On low mixer speed, alternately add the dry ingredient mixture and buttermilk to the wet ingredients, beginning and ending with the dry mixture. Mix just until flour streaks disappear. The dough will be soft and sticky—avoid overmixing to maintain a tender texture.
- Chill the Dough: Turn the dough out onto a lightly floured surface and shape it into a disk or rectangle. Wrap it tightly in plastic wrap and refrigerate for at least 2 hours, preferably overnight, to make it easier to handle and improve texture.
- Roll and Cut Dough: Lightly flour your work surface, rolling pin, and hands. Roll out the chilled dough into a large rectangle approximately ½ inch (1 cm) thick, ensuring even thickness all around. Using a sharp knife or pizza cutter, cut the dough into rectangular bars about 1 inch wide and 3-4 inches long. Place the cut bars on lightly floured or parchment-lined baking sheets.
- Heat Oil for Frying: In a large, heavy-bottomed pot, pour enough vegetable or canola oil to reach 3-4 inches deep. Attach a deep-fry thermometer and heat the oil over medium-high heat until it reaches 350°F (175°C). Maintaining an accurate temperature is crucial for even frying.
- Fry Donut Bars: Carefully lower 3-4 donut bars at a time into the hot oil using a slotted spoon, avoiding overcrowding. Fry for 1-2 minutes on each side until the bars are golden brown and puffed up.
- Drain and Cool: Remove the donut bars from the oil with a slotted spoon, allowing excess oil to drip off. Transfer them to a wire rack set over a paper towel-lined baking sheet to cool slightly. They should be warm but not hot before glazing.
- Prepare Vanilla Glaze: In a medium bowl, whisk together sifted confectioners’ sugar, whole milk or heavy cream, pure vanilla extract, and salt until smooth and pourable. Adjust the consistency by adding more milk (½ teaspoon at a time) to thin or more sugar (1-2 tablespoons at a time) to thicken, as needed.
- Glaze the Donut Bars: Dip each warm donut bar into the vanilla glaze, coating either one side or fully submerging it, then lift and allow excess glaze to drip off. Place the glazed bars back on the wire rack and let the glaze set for 15-30 minutes before serving.
Notes
- Chilling the dough is essential for easier handling and ensures tender donut bars.
- Maintain oil temperature at 350°F (175°C) to achieve perfect golden, puffed donuts without absorbing excess oil.
- Adjust the glaze consistency depending on whether you want a thin or thicker coating.
- Use a deep-fry thermometer to monitor oil temperature accurately.
- Store glazed donut bars in an airtight container at room temperature for up to 2 days for best freshness.
Keywords: Old Fashioned Donut Bars, Buttermilk Donuts, Fried Donut Bars, Vanilla Glazed Donuts, Classic American Donuts